1.
Turn off the power
Find the breaker that controls the power to the switch that you will be replacing and turn it off.
 Non-Contact
 2.
Verify the power is off by using a voltage tester
Confirm the power is off by using a voltage tester to make sure that the circuit is dead and it is safe to proceed. There are several inexpensive non-contact voltage testers that resemble a fat marker pen with a tip. Regardless of the type, read the instructions on how it should be used.
- Remove the switch cover plate by unscrewing the small screws.
- Hold the tester within half inch (if using the non-contact type) of the screw terminals. It is safe to proceed if the tester does not detect any power.
3.
Remove switch from the box
Remove the switch from the box by unscrewing the long screws at the top and bottom of the switch. Pull the switch out (with the wires still attached) and test each wire and all the other wires in the box, including any that are not connected to switch being replaced.
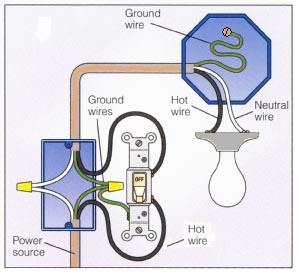
There may be 2 or 3 attached to the switch; a hot wire (black), a return wire (may be black, red, or any other color except green) that carries the load to the light fixture, and sometimes a grounding wire, which may be green or bare copper. You may find a white wire that has black tape on it connected to the switch. This tape indicates that the white wire is being used as a black, so it’s not neutral.
4.
Wire in the new switch
Compare the new switch to the old one to find the corresponding locations for the electrical screw connectors. We recommend unscrewing and connecting wires one at a time, instead of unscrewing all wires first, to avoid being confused.
Attach each wire to the same-colored screw on the new switch. To connect a wire to a terminal, strip off about 1/2 inch of insulation, using a wire stripper. Insert the stripped wire into the hole on the back or twist the end into a clockwise loop with long-nose pliers if you are using the screw terminal connection. Do the following if you are connecting to the screw terminal.
- Wrap at least two-thirds but no more than three-quarters of the way around the terminal screw.
- Hook the wire clockwise around the screw so when you tighten the screw with a screwdriver, the clockwise force of the tightening screw makes the loop wrap tighter around the screw.
5.
Install the new switch back into the box
Gently push the newly wired switch back into the electrical box and screw it in place.
Screw on the switch plate and turn on the power and test test your light.
Related articles: How to wire a fan with separate light switch