Note: Since this article was first published, a new range of Wireless Routers are now available and marketed as Wi-Fi Mesh Network Systems that provide the same benefits described in the original article. These new systems tend be expensive, ranging from $150 to over $500, depending on the brand and how many devices are included in the package, BUT, they are convenient and they do simplify the configuration steps. However, we think this article is still relevant if you are pursuing an inexpensive alternative using cheaper basic WIFi routers.
If you wish to create your own using a basic router such as the Linksys AC1200 WiFi Router that costs under $50 each, then skip to the next section on creating your own. If you are leaning towards purchasing one of the prepackaged solutions, we think Google's second generation mesh Wifi, now branded as Nest WiFi is a good option. Each router covers about 2,200sq ft, so 2-pack would cover 4,400sq ft, and a 3-pack about 6,600sq ft.

How to create your own
The most basic and least expensive way to extend wifi coverage is a wireless range extender. These devices range in price from about $20 to $100. They do the job but lacks the speed, reliability, and range compared to other solutions. The weakest part of these range extenders are the backhaul capabilities. If these satellite devices are not connected to the main router via wired ethernet, they rely on using a wireless connection, but if the wireless link is already weak (hence the reason for installing the extender), then this impairs the backhaul capabilities.
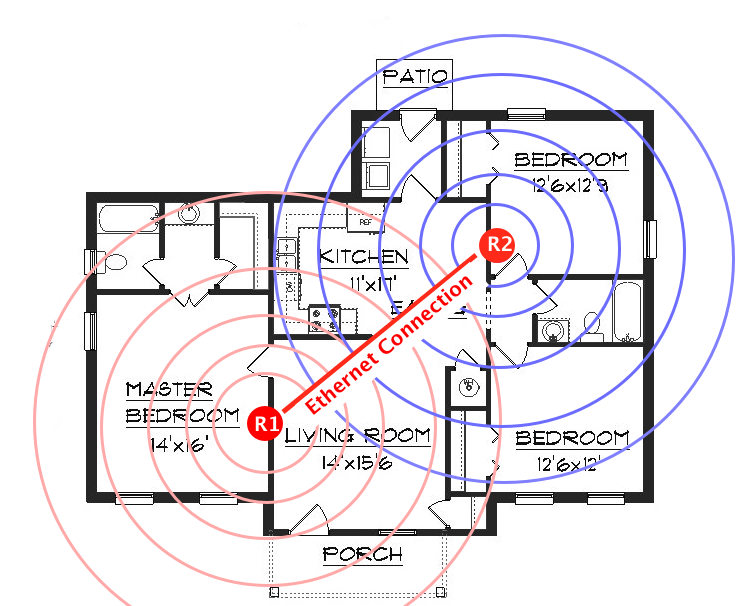
The best option to extend WiFi signal coverage, is to connect several routers together, with one being master (doles out the IP addresses to connecting devices) and the other routers acting as basic Wireless Access Points that extends the wireless coverage. Together, they share the same SSID and work seamlessly to extend the range, without compromising speed and reliability.
Steps
0.
Important Notes
- With this option, the second and subsequent routers need to be placed in the low signal areas with a ethernet connection back to the master router, which is typically co-located in close proximity to the service provider's broadband modem.
- Before you connect a router to another, make sure that both have different IP addresses to prevent addressing conflict.
- Do not connect the second router to the master router before making the configurations in step 2. The master router is the one which connects to the broadband modem and will serve as your LAN's only DHCP server.
- The routers do not need to be from the same manufacturer for this to work
1.
Configure the master router
Proceed with confguring the master router the same as you would if your were installing a single router WiFi solution. Connect the WAN port to the service provider's broadband modem.
2.
Configuring each subsequent Router
- Set the IP address to be 1 more than the master router e.g. eg. 192.168.1.2. For each additional router, set the address to be the next consecutive address e.g. 192.168.1.3. Note:using consecutive addresses is not required but it helps to simplify things. Any address can be used as long as it is outside the configured DHCP range of the main router, but within the subnet.
- Set SSID to be the same as the master router
- Set the encryption and password the same as the master router.
- Set the wireless channel so it is different than the master router.
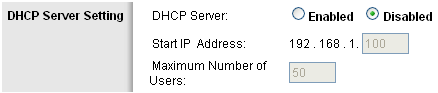
- Disable DHCP (VERY IMPORTANT). This enables the master router to be the exclusive source of IP address assignments and prevents the 2nd router from attempting to assign another address when a computer moves from the range of one router into the range of the other.
3. Connect the routers

Now you need to connect an Ethernet cable from an open LAN port on the back of the master router to an open LAN port on the back of the 2nd router. Make sure you are using a LAN port on the second router, not the WAN port you would normally use, had this been the master router.
Other related articles: MiFi - Creating your own Hotspot