Building an infrared network has has a lot of practical and cost saving benefits. The following are a few examples of these benefits:
* Allows a single device such as a DVD to be controlled and viewed from different rooms in the house * Eliminates visual clutter by allowing you to hide audio/visual equipment in a closet and away from view * Saves money by allowing you to view or share a cable box, DVR or statellite receiver from different rooms.
In this brief article I'll review how I did it; the components used, the approximate cost, and benefits derived from how its now being used. For the purposes of brevity and clarity, I've broken the article into 3 sections; first the problem is presented, second an overview of the solution, it's components and how it was implemented, and finally the benefits. So, let's get to it!
The incremental cost to add these additional viewing locations added up quickly. Each location required an additional set top box, which translated to a lot more expense.
To solve the problem I decided to;
a) move the set top box from the master bed room to the wiring closet and
b) install an InfraRed distribution network throughout the house to control the the box from various parts of the house.
We built our home in 2004, and had installed home runs of cable -- Cat5E, Coax and Fiber -- from various locations around the house to the wiring closet. So, we were fortunate to have most of the wire already installed.
To implement the solution, I purchased the following:
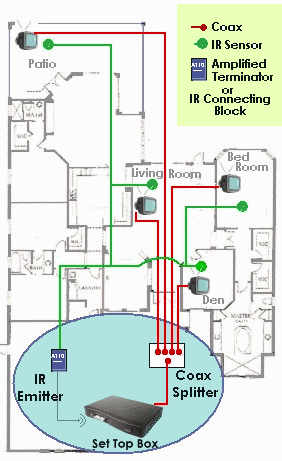
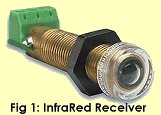
* 4 Infrared receivers or sensors (see Fig: 1) for the Den, Living room, Patio and Master Bedroom as depicted in the diagram to the right -- $39.99 each.
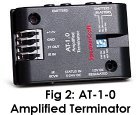
* 1 IR Amplied Terminator Block for $74.99 (see Fig: 2). Note: I could have used a 4 Emitter Infrared Connecting Block that costs $29.99, which is significantly less. However, I wanted to err on the side of caution and went with the amplified terminator block instead.
* 1 pair of IR stickon emitters (see Fig: 3). I only required one emitter but it is sold as a pair for $7.99.
* Step 1: Installed the IR sensors in each of the viewing locations by drilling a hole in the ceiling and mounting the sensor with the "eye" facing downward into the room.
* Step 2: Connected each sensor to a common wire and ran that back to the wiring closet where I connected them to the Amplified Terminator Block (AT-1-0). The installation requires 3 wires, so twisted pair is perfect. A 22-gauge cable is recommended for of 1 to 100 feet, 20-gauge cable for runs up to 200 feet, and 18-gauge cable for runs greater than 200 feet.
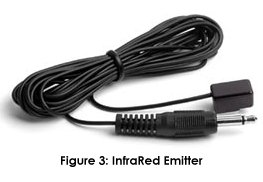
* Step 3: Connected the InfraRed emitter to the AT-1-0 by plugging in the 3.5mm jack.
- Attached the emitter end of the cable over the IR eye of the set-top box. The emitter comes with sticky tape to attach it to the device.
* Step 4: Powered up the the AT1-0. Note: Don't repeat the mistake I made, the power supply is sold separately.
- IMPORTANT: The AT-1-0 has a setting for driving 2 InfraRed blasters at high power, so be careful to set the dipswitch to the emitter position, otherwise you will fry the emitters.
* Step 5: Connected a 3ft coax cable from the back of the set-top box to the input of a coax splitter and connected the different coax cable runs from the 4 locations to the output of the splitter.
With the infrared distribution network installed, we have been able to view and control a single set-top box from 4 different televisions in four different locations. The signal from the remote is detected by the sensor installed in that location, which sends it to the AT-1-0, which transmits it to the set-top box. The program (picture and audio) from the box is sent to the coax splitter, which splits the signal and sends it to the 4 different locations.
Now granted this has its weakness in that each location is fed the same program. However, by analyzing your viewing habits you can customize this to suit your particular situation.
This solution can be used for different applications. For example;
* you could subsitite the set-top box with a DVD player and share it among different rooms
* lock away all your A/V equipment in a closet withour losing control. You would still be able to control it with your remote control even though there isn't a direct line of site
You are limited only by your imagination. Good Luck and Happy Networking.
Glen Carty (c)2007